In our WordPress SEO Checklist, we covered basic SEO steps for beginners. Now, we’ll go into more advanced topics and focus on Google Search Console.
WordPress and Google Search Console
Google Search Console is part of Google’s Webmaster Tools. It provides awesome insights into how well your WordPress website is doing within Google’s searches. Search Console will show you what people are searching for, what searches are popular, how well you’re ranking for those keywords, etc. You’ll also have other debugging tools at your disposal, plus it will tell you what’s broken.
Couple Search Console with Google Analytics and you have all the essential metrics needed for SEO. In the steps below, we’re going to dig into them and you’ll see power at your fingertips.
Here’s how you use it:
Step 1: Sign up for Google Search Console and Google Analytics.
If you haven’t already, sign up for both. The links are above.
Step 2: Use Google Search Console’s Performance.
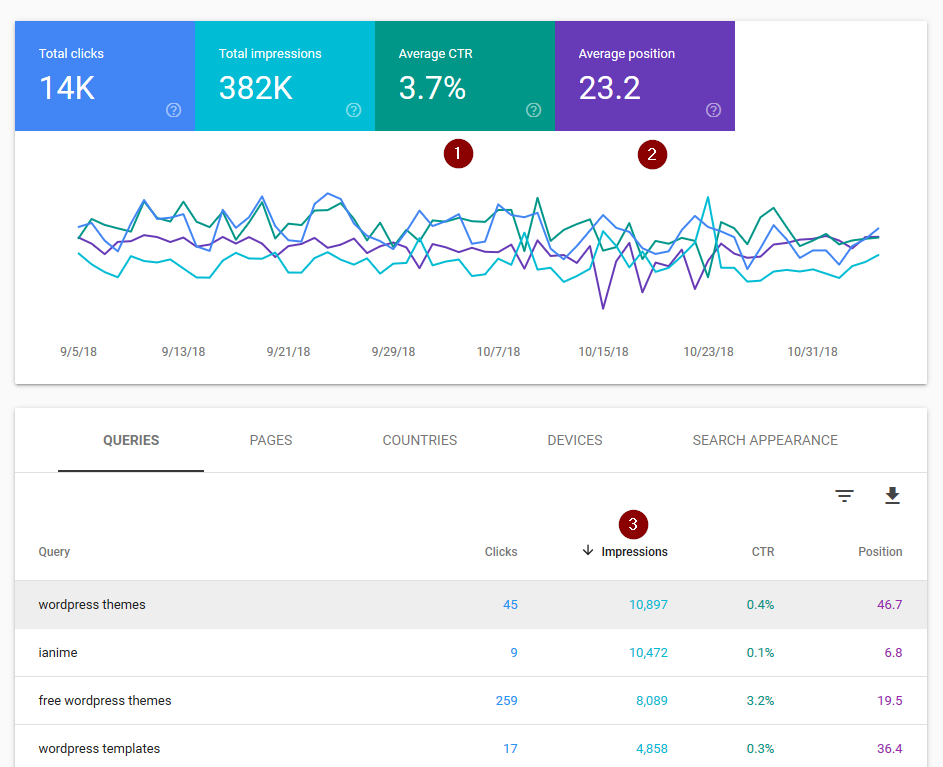
Using Google Search Console’s Performance allows you to see exactly how well you’re doing for queries. It will tell you:
- the specific queries
- how often your a page of yours shows up as a result on any page (i.e. impression)
- what position you’re in on average when it does show up
- and how many clicks you got, including click through rate
Percentage-wise, few people know about this feature. Yet, it’s one of the most useful SEO tools available.
Click on each statistic box at the top to make sure it’s selected. Selecting each one will make its column appear in the results. You can click on the heading to sort by that column.
Let’s see how we can use this to our advantage…
Step 3: Focus your efforts on your page 2 content.
Here’s why Google Search Console’s Performance tool is super useful. You can use it to maximize your effort.
Don’t worry about clicks and click through rate stats. Those are primarily dependent on your position. The higher the position, the higher the click through rate. Position #1 can get you about 20% or more of clicks.
Instead, sort by the “Impressions” column so that the queries with the highest impressions are at the top. Are there some with over 1,000? Over 5,000? Over 10,000?

Now, look at the positions (but keep the results sorted by impressions). Find the first five with positions of 20 or less. If you’re just getting started, you might not have any. But, after some time you will.
Positions 1-10 means they are on the first page of Google on average.
Positions 11-20 means second page.
You might not have ever targeted this query. It might be a prized query that you thought was way out of your reach. But, now you’re somehow ranking for it within the first two pages.
That being said, before we go on, take caution that not every high impression query is worth pursuing.
For example, one of our WordPress themes is on the first page at position 5 for a high impression one-word query. But, it gets 0 clicks from that query. Why? Because it has the same name as a foreign news website that’s popular in its country. When people search using that one-word query, they aren’t looking for our WordPress theme or any WordPress theme or even WordPress. So it would be useless for me to change things and potentially lose that theme’s ranking for other queries.
As another example, moving to one-word queries often results in “information” query intent rather than “buyer” query intent. Searching for “Switzerland” is often for information about the country itself, such as population, date it become a country, per capita income, etc. Usually, people that make such a query aren’t interest in shopping at that point in time. They just want information.
So be very careful about chasing higher level impressions, especially one word queries. You might get more visitors, but less sales.
Stick to the SEO principles we discussed earlier about brainstorming and investigating to see what the market is like.
Step 4: In Google Search Console, make sure your website is responsive.
Go into Google Search Console. In the top search bar, enter your website’s URL and press Enter.
In the bottom middle, you’ll see mobile usability section. It should hopefully have a green checkmark. If so, you’re set for SEO.
You should also test manually. Although you’re getting full SEO value from Google, the website might not look perfect from a user perspective in mobile. So check to be sure. You can do this by decreasing the width in your browser down to about what a tablet would look and then to what a mobile phone width would look like.
The better your website looks, the more users will stay on it, which increases your SEO.
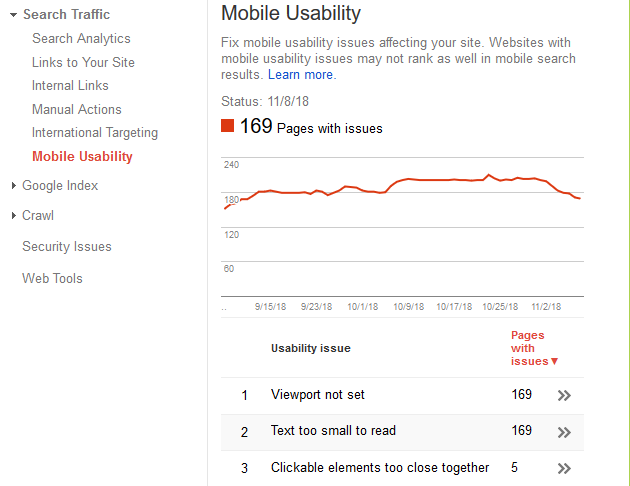
Then go to:
- “Go to old version”
- Search Traffic
- Mobile Usability and you’ll get a full list of all the pages with issues found

Step 5: In Google Search Console, check for crawl errors.
In Google Search Console, select:
- Go to old version
- Crawl
- Crawl Errors
Are there any issues reported there? If so, dig into them and see how you can fix them (if needed).
Step 6: In Google Search Console, check for blocked resources.
In Google Search Console, select:
- Go to old version
- Google Index
- Blocked Resources
Also, in old version of Google Search Console, select:
- Search Appearance
- HTML Improvements
- Check in the “Non-indexable content” section
Step 7: In Google Search Console, check your indexed status.
In Google Search Console, select:
- Go to old version
- Google Index
- Index Status
Step 8: In Google Search Console, check issues with your meta descriptions and titles.
In Google Search Console, select:
- Go to old version
- Search Appearance
- HTML Improvements
- Check in the meta area
Step 9: In Google Search Console, check for security issues.
Security affects your SEO too. If your website gets hacked, Google’s often one of the first to find out, along with browsers. Your traffic will plummet when that happens.
In Google Search Console, select:
- Go to old version
- Security Issues
Step 10: In Google Search Console, check your website’s average speed for users.
For this one, we’ll jump into Google Analytics real quick. Go to:
- Behavior
- Site Speed
- Overview
This largely depends on your users’ connection speeds. If you have an international audience, 10 seconds or less is good. Typically, that will mean your page loads in about 1 second for decent desktop connections.
Step 11: In Google Search Console, submit your sitemap.
We created the sitemap in the beginner’s WordPress SEO guide, but never submitted it. But, the Sitemap plugin I recommended would have already added your sitemap to the robots.txt. So in a sense it’s “submitted” and Google knows about it and uses it.
Just to be sure, let’s submit in Google Search Console. Go to sitemaps and enter your Sitemap URL. Usually it’s example.org / sitemap.xml (without spaces).
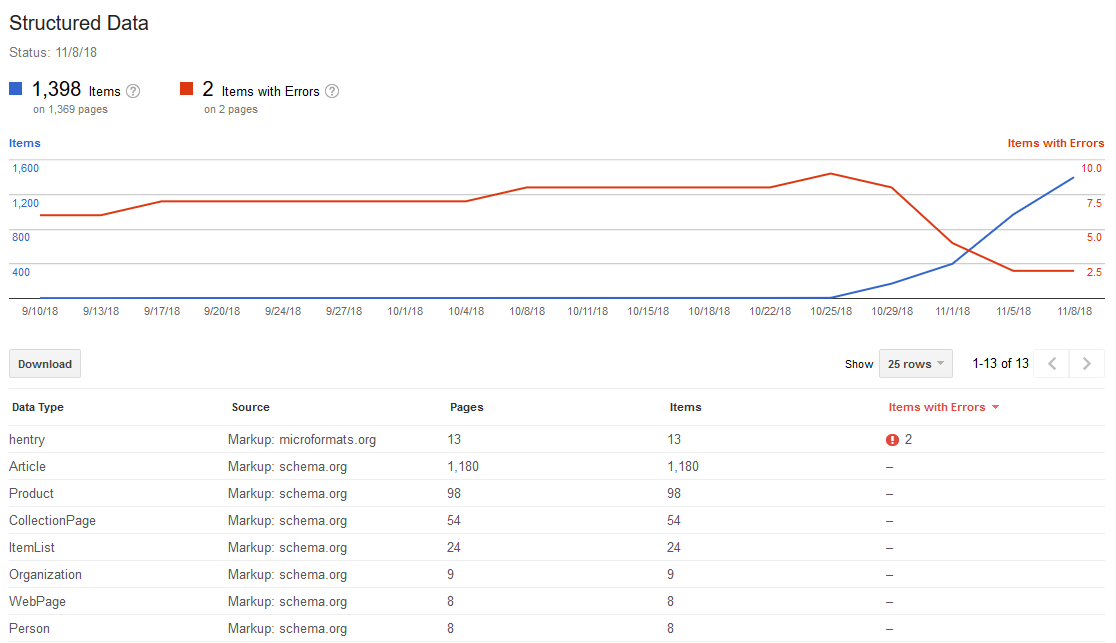
Step 12: In Google Search Console, validate your Schema Markup.
Next, in Google Search Console, at the bottom:
- select “Go to old version”
- Web Tools
- Testing Tools
- Structured Data Testing Tool
- Enter your URL (example: one of your posts)
Hopefully there are no error messages. If there are, fix them.

If you don’t have structured data, the next step will get you started with it:
Step 13: Install a Schema Markup Plugin for WordPress.
There’s a lot more than meta data than title and description. And I mean a LOT more.
But, that data can be helpful to Google and it values that data. It can mean the difference sometimes between 30 page views per week and 3,000 per week – just for one article. Why? Because it will often pull pages with good meta data to the top result of Google. More on that in the “Google’s user intent” section.
I highly recommend using WPSSO plugins by JS Morisset. They are fast and give Google exactly what it wants. You won’t need another schema meta markup plugin at all. I’m also not aware of another WordPress plugin that even comes close to what WPSSO offers.
The plugins do have a lot of set up time though. But, it’s gold waiting to be dug. And JS, the developer, has fantastic support.
Step 14: Turn on reviews in WordPress.
If you do decide to use commenting on blog posts, turn on reviews in the WPSSO plugin I mentioned earlier. That will also enable ratings to show up in Google results and users are more likely to click them.
If you don’t use commenting, you can still get ratings using a rating plugin for WordPress. But, you’ll have to use one that has a meta rating feature so that it does show up in Google results. In a later step, I’ll show you how to test your markup.
That being said, note that if you get spammers down voting your articles, your bad rating will show up in the results too. So it has its pros and cons.
Step 15: Test your image data.
We talked about images in the beginner’s guide and the importance of adding an Alt tag to each one. You can use the W3C HTML validator to quickly check. Enter your page’s URL, then go to the image section and you’ll see the results.
It’s created by the World Wide Web Consortium (W3C), which develops long term standards for the web. It’s a reliable tool that’s great for validating your HTML in general. Speaking of which…
Step 16: Validate your HTML output.
The same HTML validator as the image tester can be used to check your page’s output in general. Any errors that you see should be fixed. Warnings can probably be ignored though.
A lot of the issues reported there will be beyond this scope of this checklist. So google it, talk to a developer, or post in a general WordPress forum to get some help.
Step 17: Check your Google Search Console twice a week.
Make sure you check all these Google Search Console fairly regularly. Twice a week is a good goal to shoot for. It will give you insights into how your website is doing. More importantly, you’ll know if there any any issues from Google’s perspective. You’ll be able to correct them early rather than having a big drop in SEO.
Step 18: Keep an eye on your Analytics Stats daily.
Make it a habit to check your Google Analytics stats daily. But, don’t be concerned if you notice drops. It will fluctuate from day to day, but you should see significant rise over months.
However, if you see a big, sharp drop, that’s a sign that something is wrong. Maybe you installed a new WordPress plugin and it broke your Google Analytics data. Maybe some faulty plugin is causing issues for users and Google’s down ranking your website. Investigate whatever it is.
Here’s how to check individual pages’ stats. Go to:
- Google Analytics
- Behavior (not Audience’s Behavior, but instead lower down in the left menu)
- Site Content
- All Pages
- Enter part of the URL in the search field below the graph
Step 19: Check for bandwidth stealing.
Bandwidth stealing is when, for example, another website embeds your images on their website, while still using your URL for the image source. So not only are they stealing your images, but they are using your server’s resources to do it.
If you notice your traffic hasn’t increased much, but your hosting resources are getting eaten up or your website’s slowing, there may be bandwidth stealing happening. If the other website’s very popular, it can be very harsh for your website. Your server might not be able to keep up, or you’ll be paying a lot more.
Step 20: Use DMCA Takedowns for anyone stealing your content.
If you find out someone’s stealing your content and using it on their own website, file a DMCA Takedown with their host. If it’s left up, it can leech some of your SEO too. So it’s worth getting it taken care of if you can.
But, there’s no way you’ll be able to keep track of everyone that’s stealing your content. You have to just keep pressing on and focusing on your website. If you do things the right way, you’ll get rewarded for it.
Generally, Google’s pretty good at picking up plagiarism. But, it happens once your website has established enough authority and/or if your page has been around for a while.
Step 21: Bonus Tip – Write for your users first and foremost, but keep Google in mind.
You should write in a way that makes sense for your users. That’s your top most priority.
At the same time, you need to keep Google in mind. Don’t do things in a way Google won’t understand you.
For example, this is a very long blog post. But, there’s no way I’m going to put the content in accordion slider, even if that’s a bit better for users. Why? Because if the content’s not visible during the first page load, Google doesn’t value it.
People used to stuff unrelated content and keywords using “display:none” CSS, so that the users couldn’t see it but Google could. So it tricked Google. Google picked up on this and started not valuing any content that’s hidden by display:none or which is “off the page”.
Accordions, tabs, and other similar features will usually hide all the unopened content using display:none. They aren’t doing it for fishy purposes, but that’s simply how to get the job done. Unfortunately, Google doesn’t value that hidden content.
Because this is content that I really want to reach users who are searching for it, I’ve chosen not to use an accordion or side tabs. Yes, it’s long. But, it’s between that or no users.
Later, if Google changes how they do things, I’ll modify the content in a way that it understands it.
The principle here is that you have to find a balance between “perfect” and what works. You have to write for the users first and foremost, but keep Google in mind. If you can’t see your content when your page first loads, Google won’t value it.
Step 22: Bonus Tip – Buy more years for your domain.
If you start making a lot of money from your blog, invest in your domain. By buying 10 more years on your domain upfront, you signify to Google that you’re here to stay. You’re less likely to be a website that springs up for fishy practices for one year. So Google gives that some weight.
It’s rarely used, but it’s a useful tip for you take advantage of.
Note that buying a domain from year to year doesn’t negatively impact you at all. But, buying a lot of years up front does give you a small boost.
SEO Guide for Beginners
If you want maximum results from your blogging, check out our WordPress SEO Checklist for Beginners.


